Attention Please :
In this entire content we are acting as an intermediary between Quicklab and Google Cloud Platform, we have great vission regarding Google Cloud Community Development and Growth. Our Main focus is Vary Clear like we are writing this content to give importance to the students as well as professionals who have willing to learn Google Cloud Plateform in an efficient manner .
credit goes to :
Tracks Information.
Private Profile to Public


GSP313 : Create and Manage Cloud Resources: Challenge Lab
What you'll do :-
Lab Lik
- Task 1. Create a project jumphost instance.
- Task 2. Create a Kubernetes service cluster.
- Task 3. Set up an HTTP load balancer
Task 1: Create a project jumphost instance.
(1) : Instance creation
Task 2. Create a Kubernetes service cluster.
(PART 1a) : Deafault Zone Setup
(PART 1b) : Clusters Creation:
(PART 2) : Hello-server deployment :
(PART 3) : Expose the app on port :
Task 3. Set up an HTTP load balancer.
(PART 1) : Shell Script :
(PART 2) : Instance-Templates Creation:
(PART 3) : Instance-Groups Creation:
(PART 4) : Firewall-rules Creation:
(PART 5) : health check Creation:
(PART 6a) : Managed instance-groups :
(PART 6b) : Backend-services Creation :
(PART 6c) : Adding-backend Server :
(PART 7a) : Create a URL map :
(PART 7b) : target the HTTP proxy :
(PART 8a) : forwarding-rules creation :
(PART 8b) : List created forwarding-rules :
Perform Foundational Infrastructure Tasks in Google Cloud: Challenge Lab
What you'll do :-
Lab Lik
- Task 1. Create a bucket.
- Task 2. Create a Pub/Sub topic.
- Task 3. Create the thumbnail Cloud Function
- Task 4. Remove the previous cloud engineer
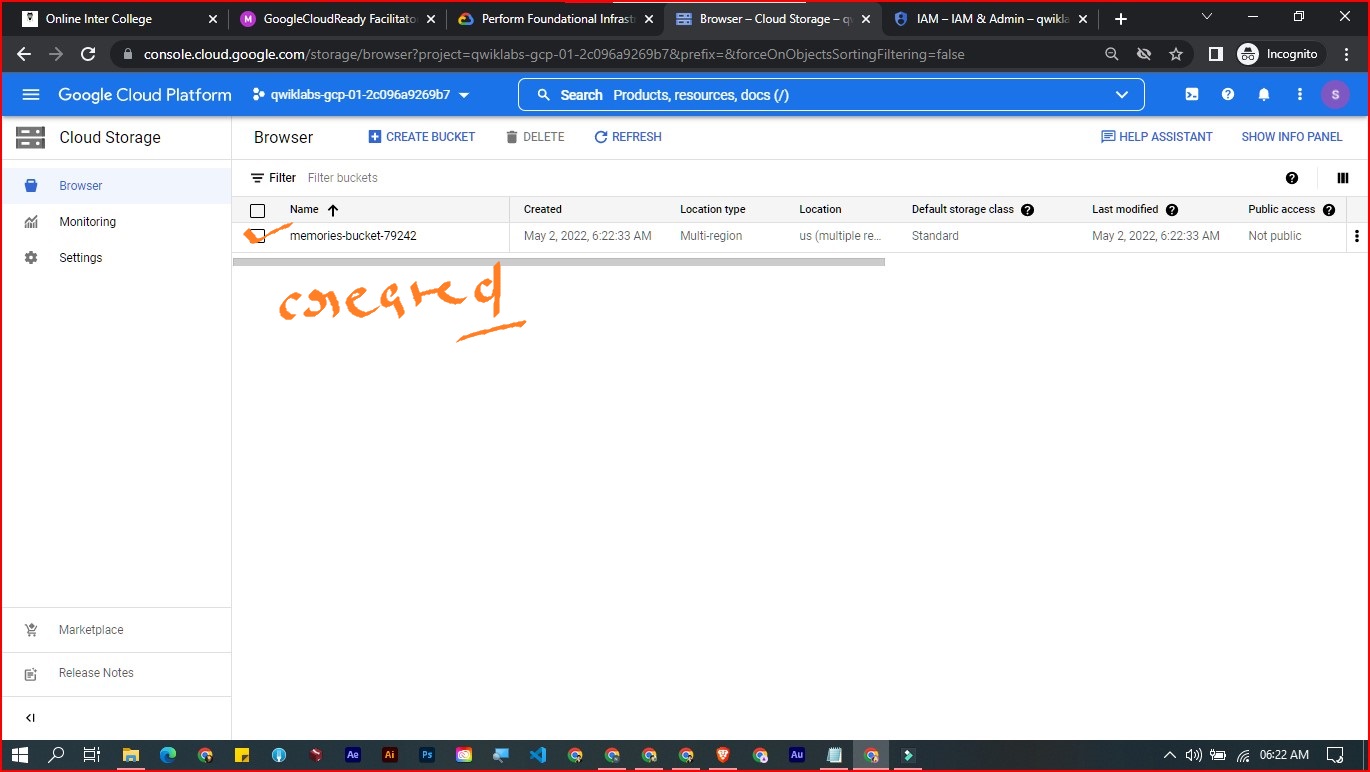
Task 1: Create a bucket
1). Navigation menu > Cloud Storage > Browser > Create Bucket
2). Name your bucket > Enter GCP Project ID > Continue
3). Choose where to store your data > Region: us-east1 > Continue
4). Use default for the remaining
5). Create
Task 2: Create a Pub/Sub topic
1) Navigation menu > Pub/Sub > Topics
2) Create Topic > Name: Jooli > Create Topic
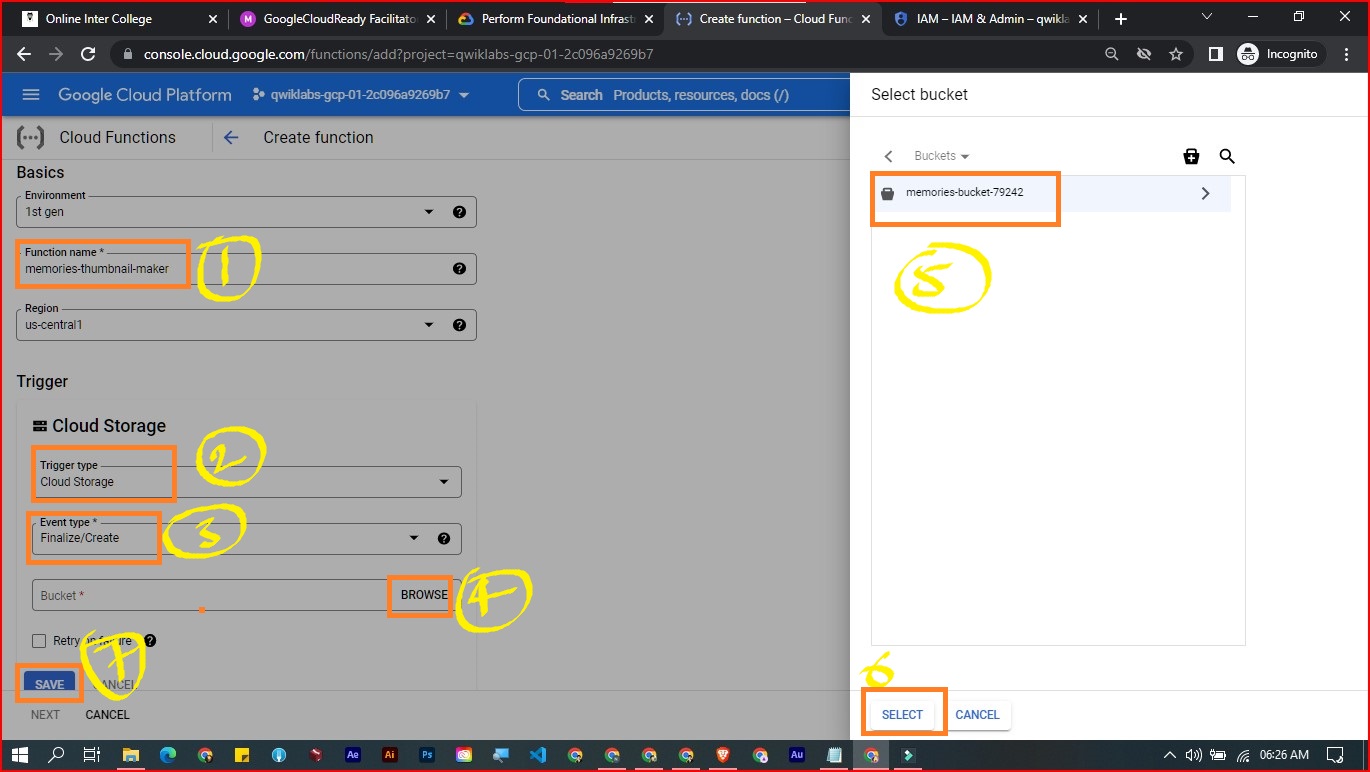
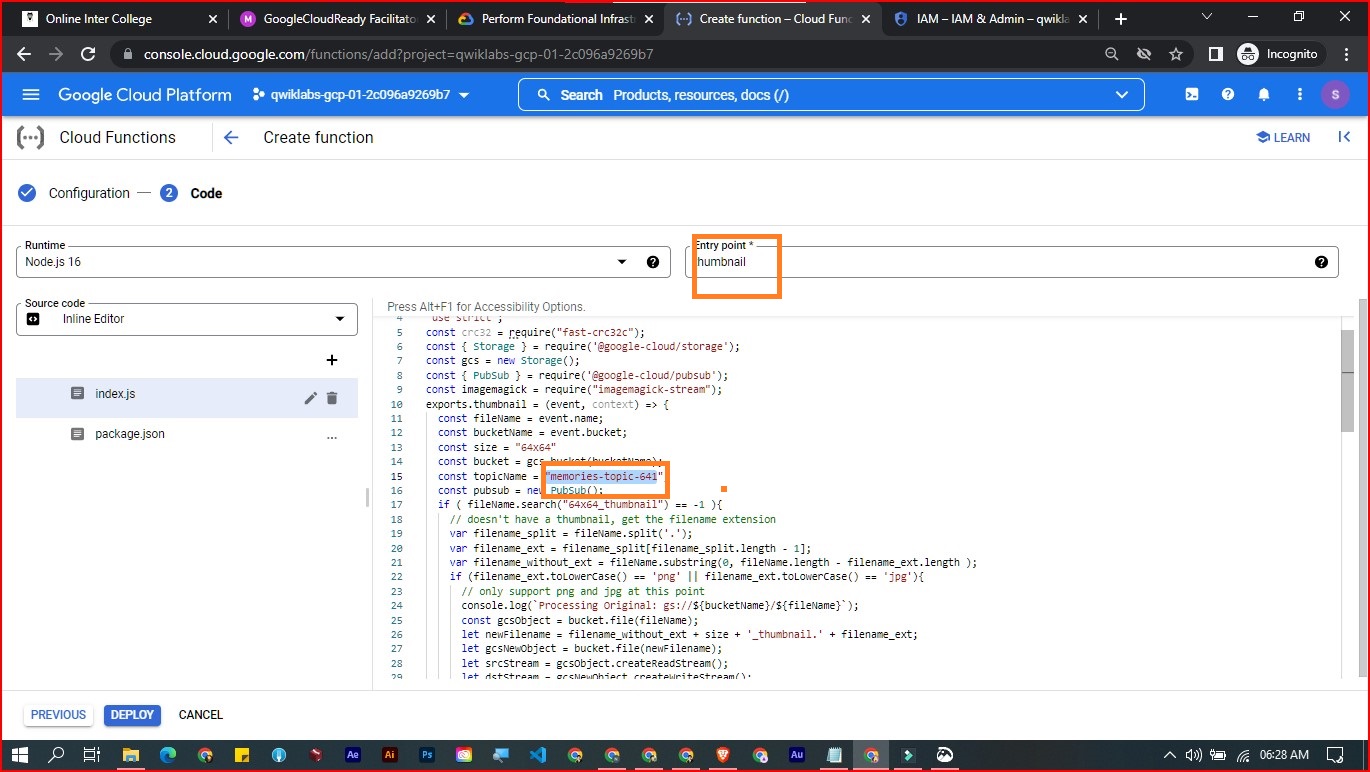
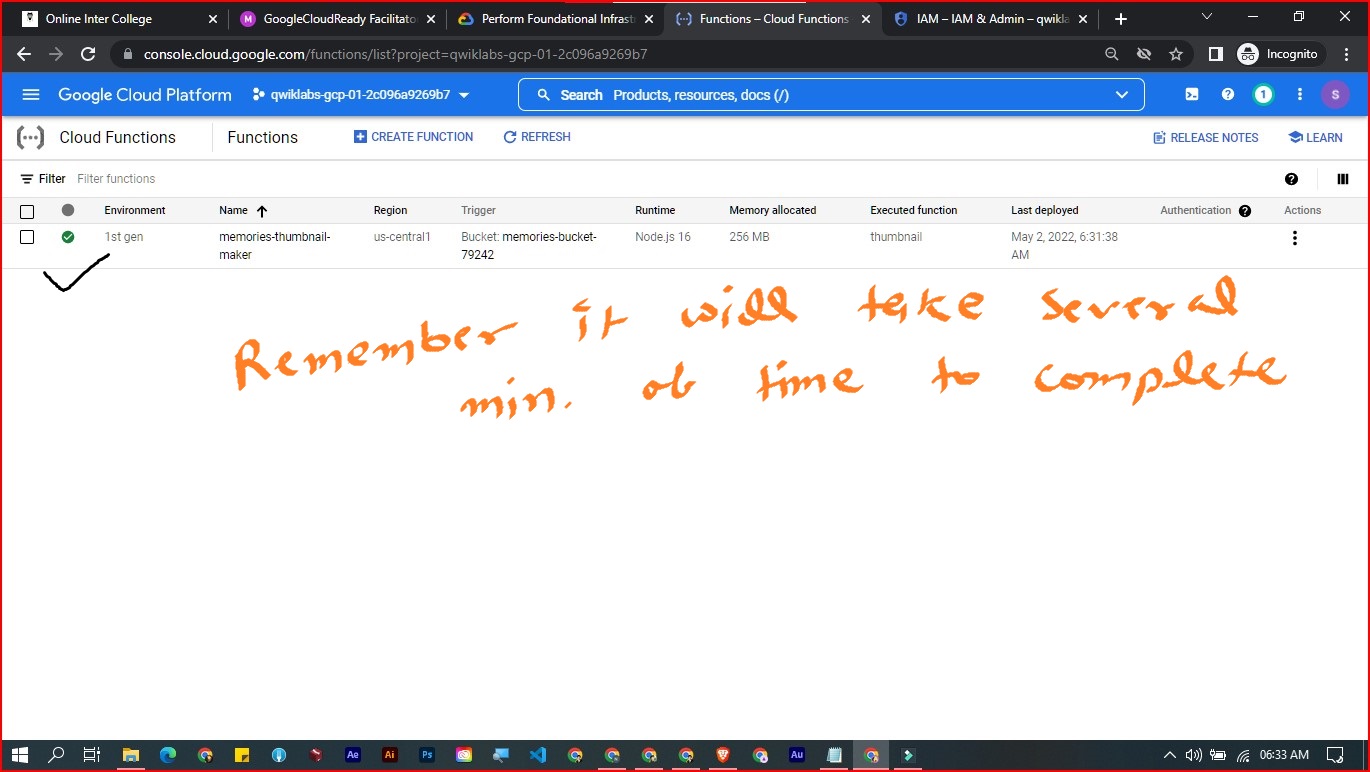
Task 3: Create the thumbnail Cloud Function.
1) .
Navigation menu > Cloud Functions > Create Function 2) .
set the following config:
A) Name: {As per given in task discription}
B) Region: us-east1
C) Trigger: Cloud Storage
D) Event type: Finalize/Create
E) Bucket: BROWSE > Select the qwiklabs bucket
Remaining default > Next
Runtime: Node.js 10
Entry point: thumbnail
Add the code As i have added.
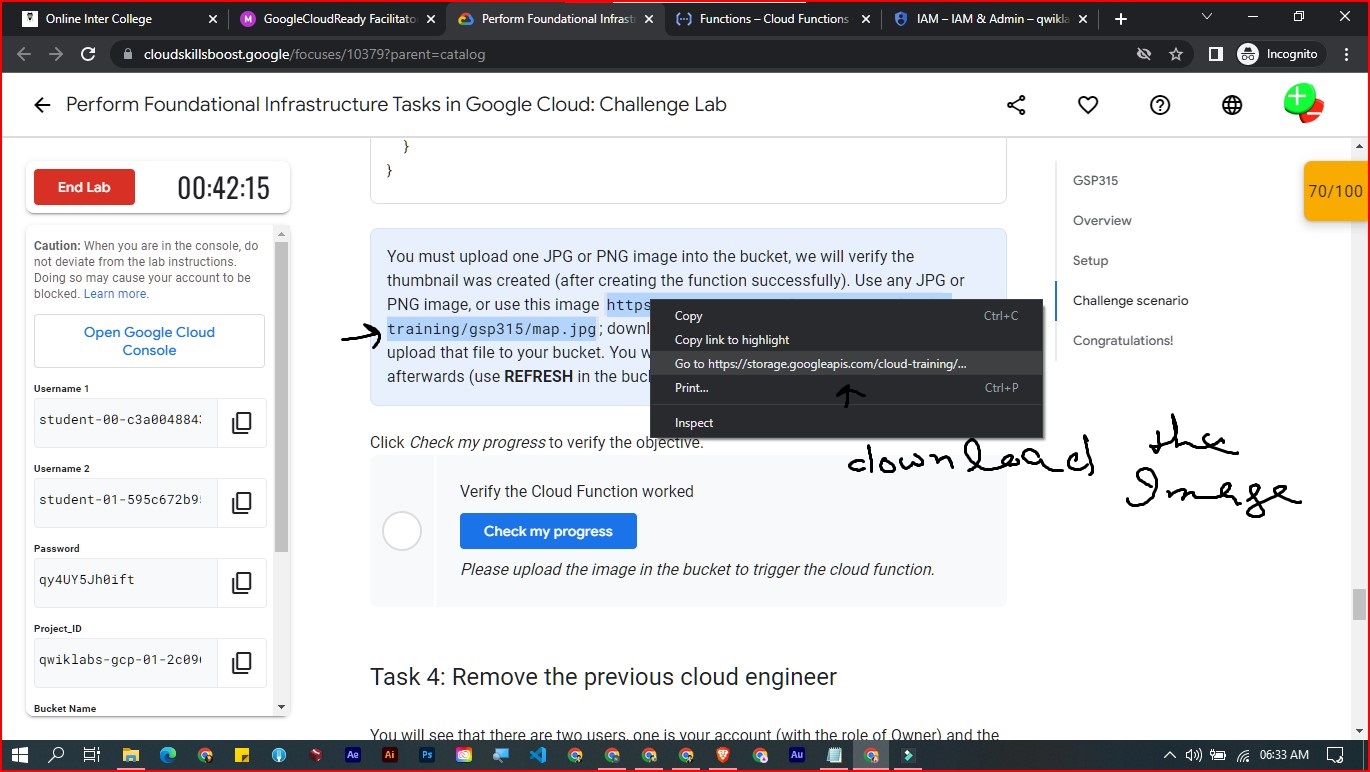
Download the image from URL
Navigation menu > Cloud Storage > Browser > Select your bucket > Upload files.
3) . Refresh bucket
Task 4: Remove the previous cloud engineer
1) . Navigation menu > IAM & Admin > IAM
2) . Search for the "Username 2" > Edit > Delete Role
1. Quest: Google Cloud Essentials
Creating a Virtual Machine [GSP001] :-
What you'll do :-
Lab Lik
- Create a virtual machine with the Cloud Console.
- Create a virtual machine with the gcloud command line.
- Deploy a web server and connect it to a virtual machine.
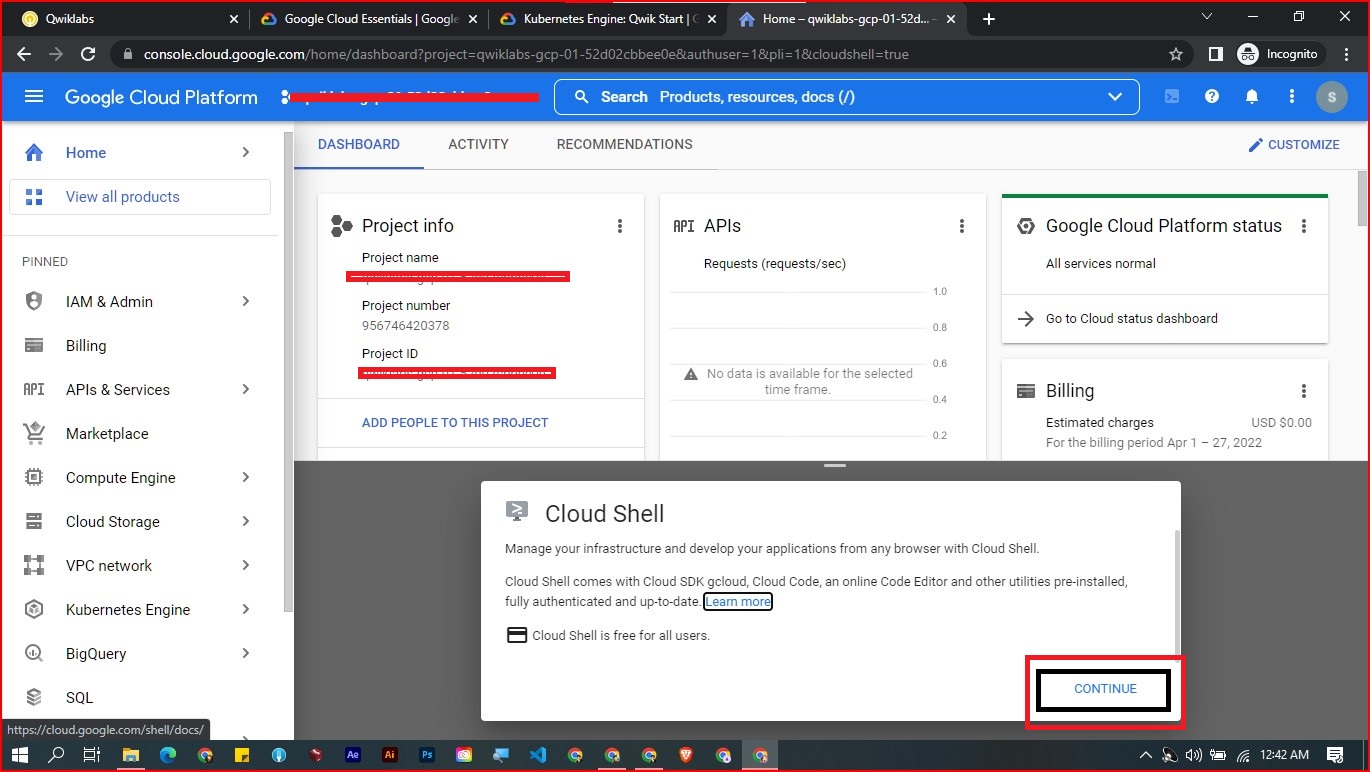
In the Cloud Console, in the top right toolbar,
click the Activate Cloud Shell button.
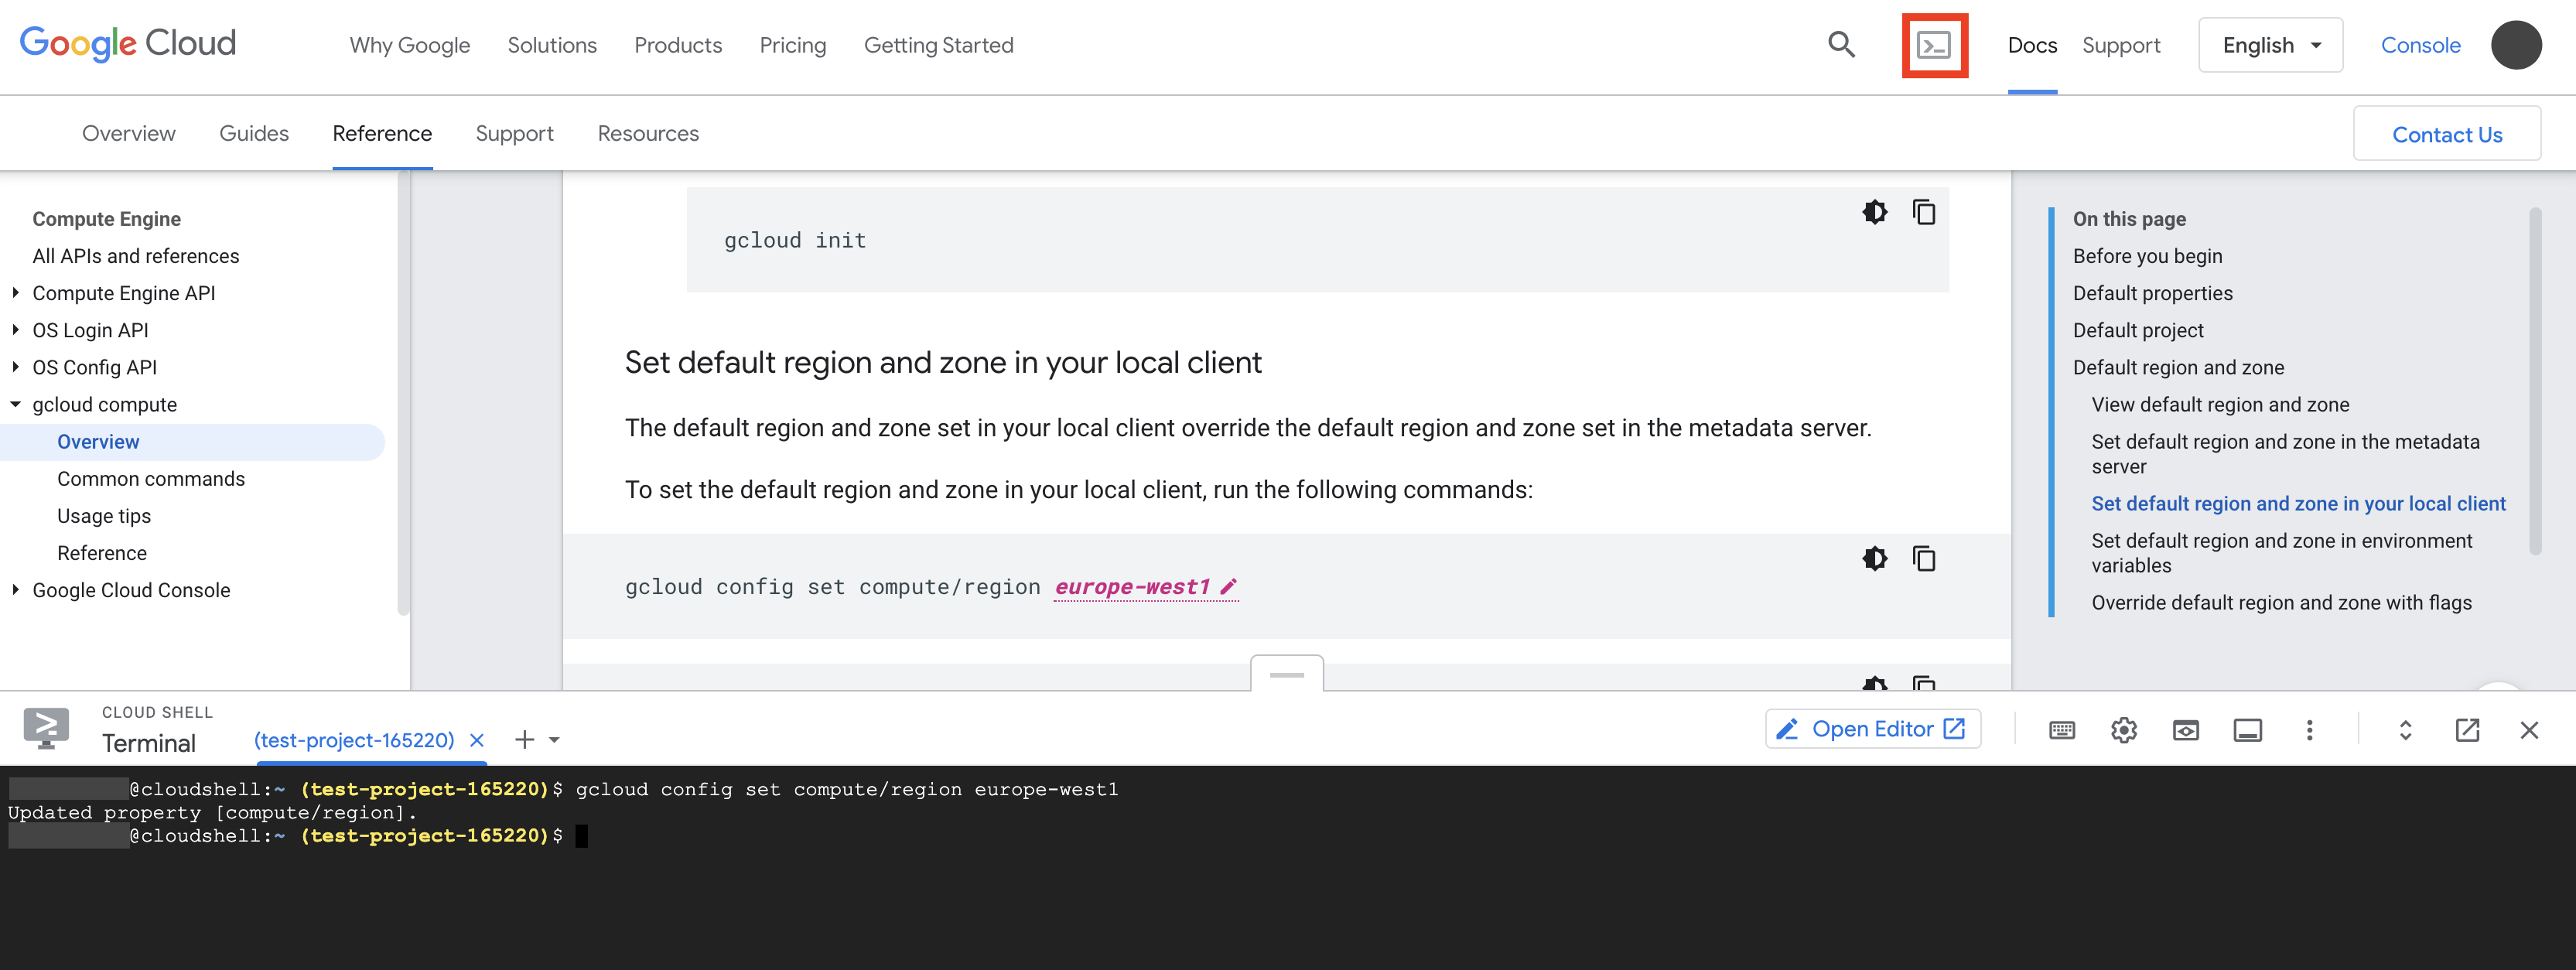
*credits goes to Google-Cloud-Docs
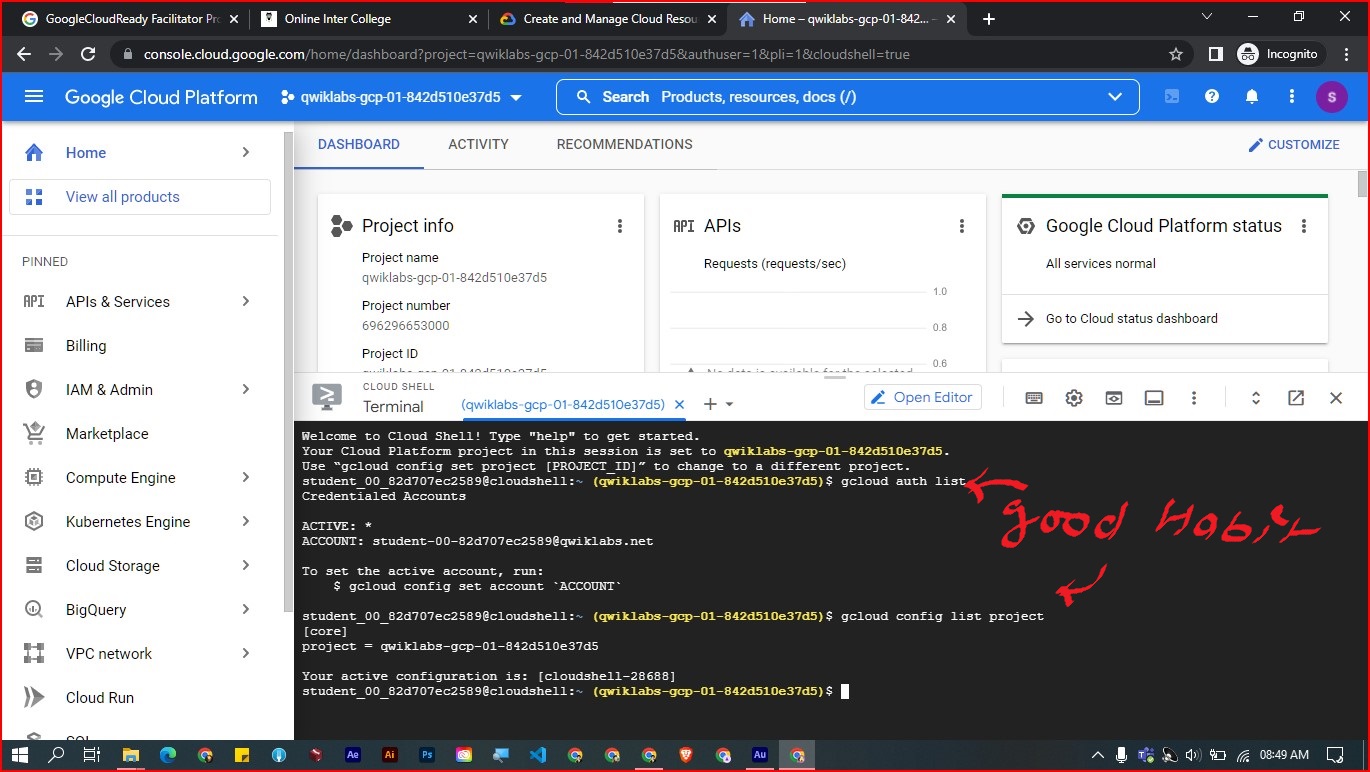
It's one of the good habit to know which account is active and in which project you are working on
Remember these points:-
To list avtive account information:
To project id's:
Task 1 :- Create a virtual machine with the Cloud Console.
                  Step 1:-

                    Click on Computer Engine -> Then click on VM Instances.


                  Step 2:-


                    In the next screen, i.e. VM Instances page, you will see a
                    create a VM instance button as shown below. (In case if any
                    VM already, then the user will see the VM Instance detail in
                    the grid).


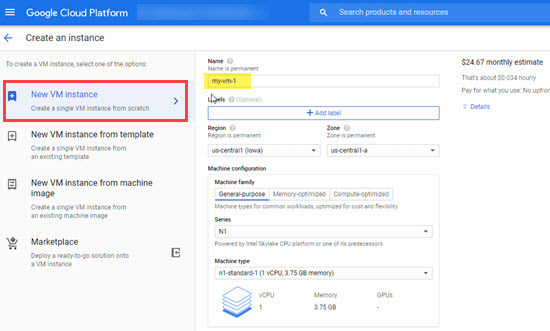
                  Step 3:-


                    Click on New VM Instance in order to create a new VM from
                    scratch. Provide the VM Instance a valid Name (as in the
                    qwiklabs, I have given name as my-vm-1). Select Region,
                    Zone, and machine configuration as per your need.

                  Step 4:-


                    Select Boot Disk. As in the example, I am using a Debian
                    operating system which is basically a Linux based OS.


                  Step 5:-


                    As I am planning to host a web page so I am allowing HTTP
                    traffic in Firewall. Click on the create button in order to
                    create the VM.


Task 2: Install an NGINX web server
Question :
How to In the SSH terminal, to get root
access
Question :
How to update your OS
Question :
How to Install NGINX:
Question :
How to Confirm that NGINX is running:
Task 3: Create a new instance with gcloud
Question :
How to in the Cloud Shell, use gcloud to
create a new virtual machine instance from the command line:
Before creating virtual machine you should have some basic understanding of Linux text editors like how to save typed file in some text editors, how to view and delete it.So first of all, I am providing you information about some basic commands of Linux editor here.
There are many text editors present in the market namely vim, nano etc.
Now in this stage of learning you must have to be vary clear about it like no doubt "vim" is fastes editor but only resion we are moving to nano that is 'nano' is one of the editor which is cerated for those people who are at the vary beginning stage of the command line ,if you already knows about vim then also no problem you can move on the next part which is how to create VM's.
For Serious Learners Only :-
Basics and shortcut of 'nano text editor'
To run Nano Text editor, use the following command :–
$
                  nano text_files/testfile
Shortcuts
                      Command
                      Action


                      CTRL + A
                      Move to beginning of line


                      CTRL + E
                      Move to end of line


                      CTRL + Y
                      Move down a page


                      CTRL + V
                      Move up a page


                      CTRL + C
                      Find out what line the cursor is currently on


                      CTRL + V
                      Move up a page


                      CTRL + W
                      Search for some text


                      CTRL + D
                      Delete the character currently under the cursor


                      CTRL + K
                      Delete entire line


                      CTRL + O
                      Save the content without exiting
Getting Started with Cloud Shell and gcloud [GSP002] :-
What you'll do :-
Lab Lik
- Task 1: Configure your environment
- Task 2: Install a new component
- Task 3: Connect to your VM instance with SSH
- Task 4: Use the Home directory
Author Note :
Let's have a little conversation/information:in the
last --GSP001 we have discussed about how we can use Google
Cloud platform through cloud console now in this we will
discuss about cloud Shell.
Remember one point, This article is completely dedicated to
cloud shell and we will practice a lot to get a better
understanding how we can use cloud shell as a resource to
interact Google Cloud platform.
As now we have adopted a good habit, which is that we are the first to know which project we are working on and which account at the time is active. so we ran following cammands first


To list avtive account information:
To project id's:

Task 1: Configure your environment
Zones and Regions are like Geographical locations .
like:
In asia-south1-b 'asia' indicates location
worldwide and with combination of 'south1', it's indicates
complete region.
zone = Region-a/b/c
For More inderstanding click here
Question :
How to see what your default region and zone
settings are:
Now we can see here default zone/region are not set or unset.

Question :
How to Find What is the default zone and
region for our project
replace
your_project_ID from shell cmd

Can you see have discoverd a problem at this stage ?
That problem is whenever we need to define or use project id unfortunetly we need to write whole string of characters. To avoid it we can assign it to a variable like given below.
point 1
Note: change Project id with your project ID,
see above image where you can get it.
point 2
Note: change zone with your zone, see above
image where you can get it.
point 3
Note: change zone with your zone, see above
image where you can get it.
Create a virtual machine with the gcloud tool:

Task 2: Install a new component
(Optional But You Must have to know)
Install the beta components: Google Cloud sdk we will help us in to Enable the gcloud interactive mode:

Task 3: Connect to your VM instance with SSH
To continue, type Y.than press ENTER twice and to return to
                  project run exit
Task 4: Use the Home directory
Change your current working directory:
cd $HOME
Now Watch the video here for full explation :-
Question :
How to set your default compute zone to
us-central1-a:
*Optional
Kubernetes Engine: Qwik Start [GSP100] :-
What you'll do :-
Lab Lik
- Task 1: Set a default compute zone
- Task 2: Create a GKE cluster
- Task 3: Get authentication credentials for the cluster
- Task 4: Deploy an application to the cluster
- Task 5: Deleting the cluster
Bwcause of our good habit we will run first, At the Activating stage of cloud shell these two cmd's.
To list avtive account information:
To project id's:


Task 1: Set a default compute zone


Question :
How to set your default compute zone to
us-central1-a:

Task 2: Create a GKE cluster
Question :
How to Create a GKE cluster?
(*change cluster-name)


Task 3: Get authentication credentials for the cluster
Question :
How to Get authentication credentials for
the cluster?
Task 4: Deploy an application to the cluster
Question :
How to create a new Deployment
hello-server?
Question :
How to create a Kubernetes Service?
Question :
How to inspect the hello-server Service?


Task 5: Deleting the cluster
Question :
How to Deleting the cluster?
type Y to confirm.


Set Up Network and HTTP Load Balancers [GSP007] :-
What you'll do :-
Lab Lik
- Task 1: Set the default region and zone for all resources
- Task 2: Create multiple web server instances
- Task 3: Configure the load balancing service
- Task 4: Sending traffic to your instances
- Task 5: Create an HTTP load balancer
- Task 6: Testing traffic sent to your instances
Bwcause of our good habit we will run first, At the Activating stage of cloud shell these two cmd's.
To list avtive account information:
To project id's:
Task 1: Set the default region and zone for all resources
To set the default zone:
To Set the default region:
Task 2: Create multiple web server instances
To implement load balancing first we create three VM's in default region with same tags.
First VM:
Secound VM:
Third VM:
Create a firewall rule to allow external traffic to the VM instances:
list your instances:
Task 3: Configure the load balancing service
1:static external IP
2:HTTP health check
3: service to function
4:Add the instances to the pool:
5:forwarding rule
Task 4: Sending traffic to your instances
To view the external IP address of the www-rule forwarding rule
Task 5: Create an HTTP load balancer
Question:
How to create instance template ?
Question:
How to crate Managed instance groups (MIGs)?
Question:
How to crate firewall rule?
Question:
How to set up a global static external IP
address?
Question:
How to Create health check for the load
balancer?
Question:
How to Create Create a backend service:?
Question:
How to add your instance group as the
backend to the backend service?
Question:
How to Create a URL map to route the
incoming requests ?
Question:
How to Create a target HTTP proxy to route
requests to your URL map?
Question:
How to Create a global forwarding rule to
route incoming requests to the proxy?
Task 6: Testing traffic sent to your instances


2. Quest: Baseline: Infrastructure
Create and Manage Cloud Resources: Challenge Lab [GSP313]
What you'll do :-
Lab Lik
- Task 1. Create a project jumphost instance
- Task 2. Create a Kubernetes service cluster
- Task 3. Set up an HTTP load balancer
First we activate cloud shell and set inviornment as per our need. Follow images and respective cmds as in the video we are disscusing.
Activate cloud shell as in the image we have clicked on.


Our Good Habit First comes in into the Queue:
Run these two cmds in cloud shell to get information
about in which enviornment we are working on.
Follow images as
well as Video we already given to you.
To list avtive account information:
To project id's:
Task 1. Create a project jumphost instance
We have two options to create VM's ,
First: Through Console.
Secound : Through Cloud Shell.
Here we will
perform our tasks in first method "through console"
First click on nevigation manu to access resoursess/products as in the image and as well as video we have done.

Now have a click on CREATE INSTANCE button.

Now take name as per your choice or as you have been recommended in the lab.

Now choose series and machine type and OS ,as per requirenment .
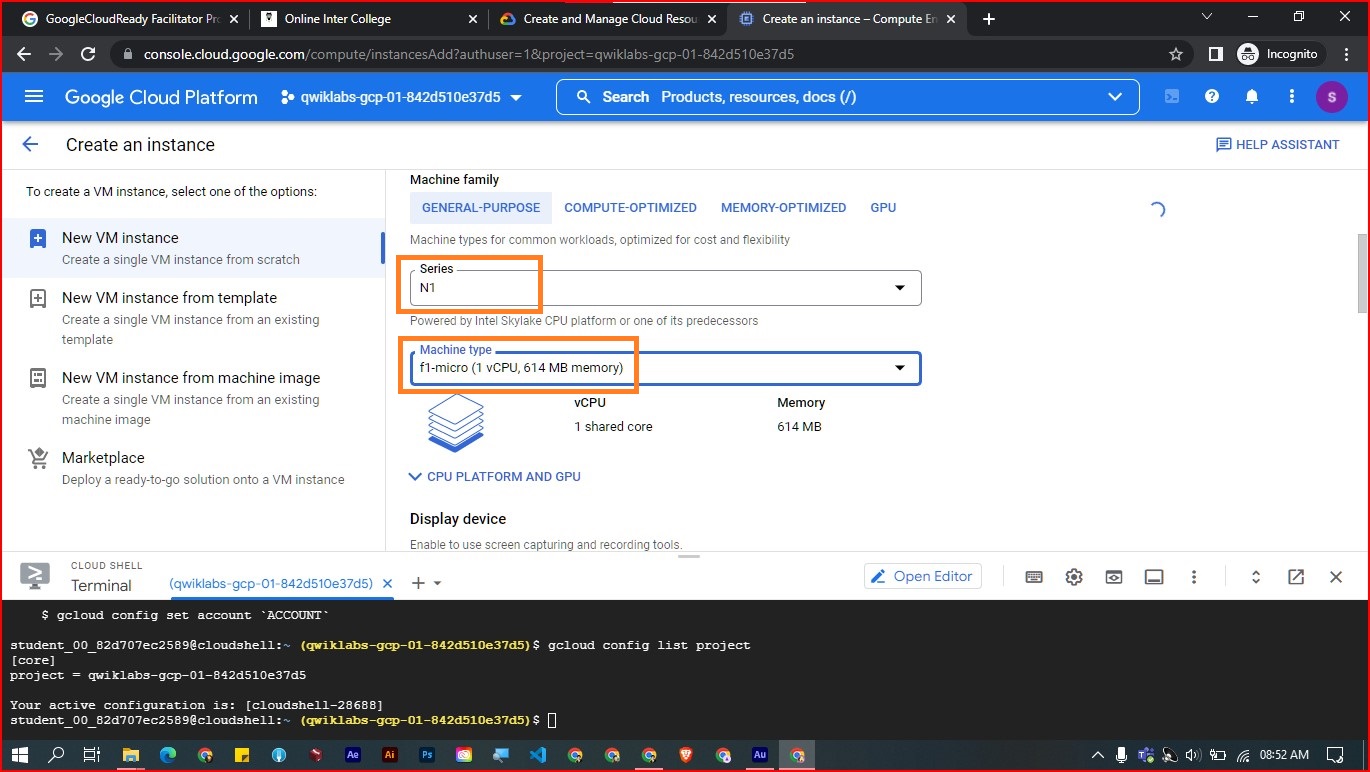


Click On Create Button.


Note :
Before Jumping to Task ' creation of cluster in specific zone/region '
,
we need to set them as per mentioned in our
challenge/requirment_doc
Run these cmds to know in which region(location) we are working on:
Question :
How to get value of current zone?
Question :
How to get value of current region?

Now set region and zone as given below:
Question :
How to set default value of current region?
Question :
How to set default value of current zone?

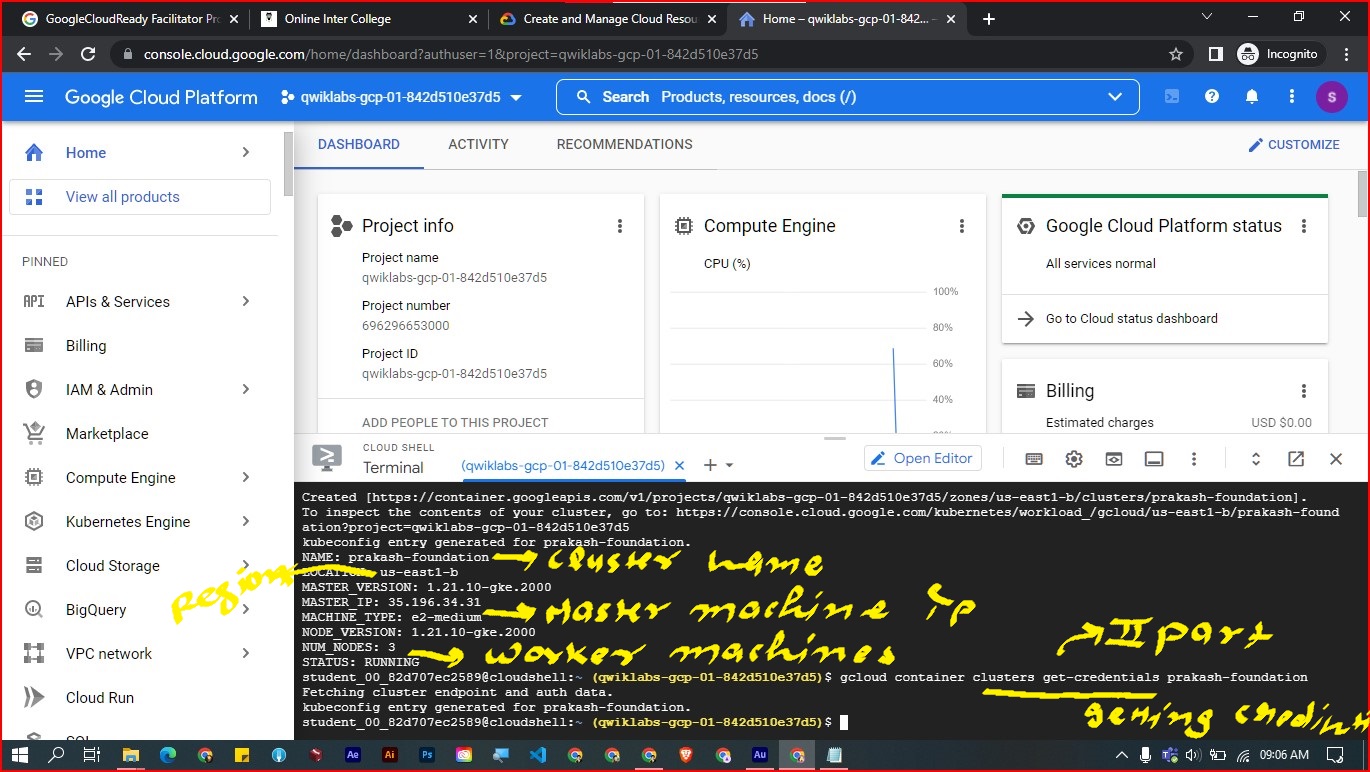
Task 2. Create a Kubernetes service cluster
Now wecan create cluster in zone us-east1-b
Run the cmd into cloud shell for creating cluster (take name as per your choice)
Question :
How to create cluster through cloud shell?
(change
CLUSTER-NAME)

We can perform another things on created cluster after the
authentacation/credintials.
To do it run the cmd given below
Question :
Question : How to Get authentication credentials
for the cluster?
(change cluster name)
Now Create the deployment of hello server with the help
of kube-ctl cmd and than expose it on port
8081
Question :
Question : How to create a new Deployment
hello-server?
(change version as per requirnment)
Question :
How to create a Kubernetes Service?


Now get the service by running the cmd
Question :
How to inspect the hello-server Service?


Task 3. Set up an HTTP load balancer
To make it happend we have several steps all with explation given below.
Step 1:
Run into cloud shell, shell script given below
Question :
Shell script :-
Now create instance teemplate
Question :
How to create instance template?

Now to create pool.
Question :
How to create pool?
Now create instance group.
Question :
How to create MIG?

Now create firewall-rules.
Question :
How to create firewall-rules?

Now check health and how to create back-end.
Question :
How to check health?
Question :
How to create backend-services?

Question :
How to add backend-services?
Question :
How to add url Map?
Question :
How to create proxy?

Question :
How to create forwarding-rules?

Now Verify Load-balencing service by following these steps:-


Perform Foundational Infrastructure Tasks in Google Cloud: Challenge Lab [GSP315]
What you'll do :-
Lab Lik
- Task 1. Create a bucket
- Task 2. Create a Pub/Sub topic
- Task 3. Create the Cloud Function
- Task 4. Remove the previous cloud engineer
Task 1. Create a bucket


Task 2. Create a Pub/Sub topic


Task 3. Create the Cloud Function


Task 4. Remove the previous cloud engineer


Build and Secure Networks in Google Cloud: Challenge Lab [GSP322]
What you'll do :-
Lab Lik
- Task 1. Remove the overly permissive rules
- Task 2. Start the bastion host instance
- Task 3. Create a firewall rule that allows SSH (tcp/22) from the IAP service and add network tag on bastion
- Task 4. Create a firewall rule that allows traffic on HTTP (tcp/80) to any address and add network tag on juice-shop
- Task 5. Create a firewall rule that allows traffic on SSH (tcp/22) from acme-mgmt-subnet network address and add network tag on juice-shop
- Task 6. SSH to bastion host via IAP and juice-shop via bastion
First we activate cloud shell and set inviornment as per our need. Follow images and respective cmds as in the video we are disscusing.
Activate cloud shell as in the image we have clicked on.
Our Good Habit First comes in into the Queue:
Run these two cmds in cloud shell to get information
about in which enviornment we are working on.
Follow images as
well as Video we already given to you.
To list avtive account information:
To project id's:
Task 1. Remove the overly permissive rules
First Method:
Question :
How to Remove the overly permissive rules?
Secound Method:

Task 2. Start the bastion host instance
Do as in the image and video we have mentioned :


Task 3. Create a firewall rule that allows SSH (tcp/22) from the IAP service and add network tag on bastion
First Method:
Question :
Create a firewall rule that allows SSH (tcp/22) from the IAP service and add network tag on bastion?
Note Change them in cmd (watch the video):-
1. Project-Name
2. SSH IAP network tag
Now We need to edit both VM's tareted tag (watch the video)

Secound Method:


Task 4. Create a firewall rule that allows traffic on HTTP (tcp/80) to any address and add network tag on juice-shop
First Method:
Question :
Create a firewall rule that allows traffic on HTTP
(tcp/80) to any address and add network tag on juice-shop (watch the video):-
1. Project-Name
2. HTTP network tag
Secound Method:


Task 5. Create a firewall rule that allows traffic on HTTP (tcp/80) to any address and add network tag on juice-shop
First Method:
Question :
Create a firewall rule that allows traffic on SSH (tcp/22) from acme-mgmt-subnet network address and add network tag on juice-shop (watch the video):-
1. Project-Name
2. SSH internal network tag
Secound Method:

Edit Juice-shop instance networking tag again (add SSH-internal-network-tag)

Task 6 : SSH to bastion host via IAP and juice-shop via bastion
Watch the video and run into beaston VM SSH following cmd:
Question :
SSH to bastion host via IAP and juice-shop via bastion (watch the video):-
1. Internal-IP


Thank you #GarryBhai
ReplyDeletehappy to help :)
DeleteBhai last task mein permission denied aa rhahe kya karna hein
ReplyDeleteMust watch new video for this :- https://youtu.be/M8HOuMr8-_U
Delete